Saturday, 27 January 2018

Region Segmentation in Image

Region Segmentation

What we will be doing on this blog?
We will segment an image into two regions ie foreground and background and then assign a unique label to each object in the foreground.

A region is a subset of an image. Region segmentation is grouping the pixels in an image into regions. 

To segment an image into different regions we need to differentiate the regions. There can be many things on which the differentiation can be done. In this blog, we will use the pixel intensity as differentiating factor. For example, let's assume we have an 8-bit(pixel values can be from 0 to 255) grayscale image and we decide that every pixel above the intensity 50 belongs to the foreground and less than equal to 50 belongs to the background. In this way, we have created 2 different regions in the image ie the foreground and the background. This method of deciding the foreground and the background based on a threshold value is called thresholding.


Thresholding
There are three types of thresholding:
  1. Automatic Thresholding
  2. P-tile Thresholding (Manual thresholding)
  3. Choose a threshold value by looking at the image
P-tile Thresholding(Manual): If we know that one or more objects occupy a fixed area on the image, then we can choose a threshold T such that p percent of pixels would have gray level value < T.

Automatic Thresholding: In this method, the program automatically chooses one or more threshold values and segment the image based on those values.

For simplicity, in this post, we will be setting the threshold manually by looking at the image. Looking at the image directly may not give you an idea of what the threshold should be so what we can do is plot the histogram of the image and try to find the threshold from that. For example look at the image(image 1) below, you may not be able to see what the threshold should be. 


Now see the histogram of this image. In the histogram, you can see that there are two peaks, one with a peak around 70 and the other with a peak around 180. These two peaks represent the two regions in the image. The background is dark so the peak corresponding to the background will be the one peak around 70 and the coins are light gray so the peak corresponding to it is around 180.
So, to pick a threshold we select a low value between these peaks. In this histogram, this value will be around 110.

Histogram: x-axis is the pixel intensity and the y-axis is the number of pixels at that intensity.


Segmenting the image into foreground and background


Now that we have got the threshold value next step is to convert the image into a binary image. A binary image is an image with only 2 pixel-intensities ie 0 and 1. Let us represent the background by 0 and the foreground by 1(this is not compulsory you can use the opposite of it as well). To convert the grayscale image to binary image, create a new zero array of the size of the original image, loop through all the pixels of the original image. If the intensity of the pixel is above the threshold set the corresponding pixel in the zero array to 1 and let it be zero otherwise. Look at the code below to understand better.

 rows,columns = image.shape  
 binary_image = np.zeros((rows , columns))  
   
 for i in range(0, image_rows_len):  
   for j in range(0, image_columns_len):  
     if(image[i][j] > 110):  
       binary_image[i][j] = 1  


After converting the image to binary image you would get something like this:


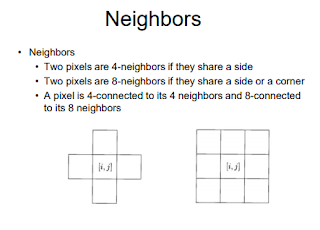
Now that we have the image of two regions we can see that it has 10 components(10 coins). We can assign a unique label to each of these components using the component labeling algorithm. Before I tell you what this algorithm is there are a few terminologies that you should know.

The first one is Neighbors.


The following image shows the result of the labeling algorithm. 


The connected component labeling algorithm is the following:
This algorithm uses the 4 neighbor definition of connected component ie two pixels share a boundary and both of them belong to the foreground then they are considered as connected. In other words, two pixels are connected if there a 4-path between them.


 1
 2
 3
 4
 5
 6
 7
 8
 9
10
11
12
13
14
15
16
17
18
19
20
21
22
23
24
25
26
27
28
29
30
31
32
33
34
35
36
37
38
39
40
41
42
43
44
45
46
47
48
49
50
51
52
53
54
55
56
57
58
59
60
61
62
63
64
65
66
67
68
69
70
71
72
73
74
75
76
77
78
79
80
81
82
83
84
85
86
87
def segment_region(img):
    labels = img * 0
    n, m = img.shape
   
    eqivalenceList = []
    # increment label number only if you assign a new label
    label = 1
    
    #looping through every pixel of the binary image
    for i in range(0, n):
        for j in range(0, m):
            #we only run this algorithm on foreground pixels
            if (img[i][j] == 1):
                # check if row above exists
                if (i > 0 and j > 0):
                    # we are not in the top row or leftmost column, label pixel if 1
                    if (img[i][j] == 1):
                        # check if the pixel above it has a label
                        if (labels[i - 1][j] != 0):
                            labels[i][j] = labels[i - 1][j]
                        else:
                            # pixel above doesn't have a label, check left neighbor pixel
                            if (labels[i][j - 1] != 0):
                                labels[i][j] = labels[i][j - 1]
                            else:
                                # it doesn't have a top or left neighboring labelled pixel so assign a new pixel
                                labels[i][j] = label
                                label += 1
                        # if both top or left neighboring pixels are there, we have to insert
                        # them in equivalence table
                        #this is the case when we are assigning label to current pixel and its top and left neighbor have different labels
                        #As all three of them would be connected in a 4 path they all should belong to same label(region)
                        if(labels[i - 1][j] != 0 and labels[i][j - 1] != 0 and labels[i][j - 1] != labels[i - 1][j]):
                            # check if this pair of values are not already in the list
                            inserted = False
                            for evalList in eqivalenceList:
                                if (labels[i - 1][j] in evalList):
                                    evalList.append(labels[i][j - 1])
                                    inserted = True
                                    break
                                elif (labels[i][j - 1] in evalList):
                                    evalList.append(labels[i - 1][j])
                                    inserted = True
                                    break
                            if (not inserted):
                                eqivalenceList.append([labels[i][j - 1], labels[i - 1][j]])

                else:
                    # we are in the top row or the leftmost column
                    
                    # check if we are in the top row. If we are in the top row and there is a pixel on the left
                    # that is labelled , then we can just copy the label.
                    if (i == 0 and j > 0):
                        if (labels[i][j - 1] != 0):
                            labels[i][j] = labels[i][j - 1]
                    # we are in the leftmost column 
                    # check if we are in the leftmost column. If we are in the leftmost column and there is a pixel on the top
                    # that is labelled , then we can just copy the label.
                    if (i > 0 and j == 0):
                        if (labels[i - 1][j] != 0):
                            labels[i][j] = labels[i - 1][j]
                    # case 0,0, top most row , leftmost column
                    if (i == 0 and j == 0):
                        if (img[i][j] == 1):
                            labels[i][j] = label
                            label = label + 1

    # length of equivalence list does not tell the number of regions. foreground that are one pixel in area
    # or other regions in which only one label is set to all the pixels in the regions will not be in the
    # equivalance list

    #Right now each region may contain more than one labels. Here we set the minimum label that the region has to that region.
    for evalList in eqivalenceList:
        for i in range(0, n):
            for j in range(0, m):
                if (labels[i][j] in evalList):
                    labels[i][j] = min(evalList)

    # to get the total number of regions see the number of different values in labels array
    # background will be given label 0
    diffLabels = []
    for i in range(0, n):
        for j in range(0, m):
            if (labels[i][j] not in diffLabels):
                diffLabels.append(labels[i][j])

    return diffLabels, labels


Wednesday, 27 December 2017

Edge detection in an Image

Hi, in this post I will show you what is edge detection and how you can implement it in python.

1.What is edge detection?

Edge detection is an image processing technique for finding the boundaries of objects within images. It works by detecting discontinuities in brightness.

Canny edge detection applied to a photograph. src


Common edge detection algorithms include 
  1. Sobel
  2. Canny
  3. Prewitt
  4. Roberts
All these algorithms(except canny) defer in the mask that is applied on the image. Canny is a little more complex and includes few more steps.

2.Types of edges


  1. Step Edge: The intensity of the image pixels change abruptly, i.e. the difference in the intensity of adjacent pixels in an image is large.
  2. Ramp Edge: The intensity change but smoothly.
  3. Line Edge: The intensity abruptly changes and then gets back to original value.
  4. Roof Edge: The intensity changes smoothly and then gets back to the original value.


3.Gradient

The magnitude of change of intensity is called the gradient of a pixel. The gradient in 2-D is equivalent to the first derivative. The intensity of the pixels in the image can change in horizontally and vertically. The change in intensity along the horizontal direction is called the horizontal gradient or gx and the change in the vertical direction is called the vertical gradient or gy. 

Note - The coordinate system of the image starts from the top left corner with x increasing as we go towards the right and y increasing as we go down. x and y are also sometimes represented as i and j respectively.

The formula shown below calculates the gradient of a pixel. We need to calculate the gradient at every pixel.
SRC: wiki
df/dy and df/dx are horizontal and the vertical gradients. These are very easy to calculate, what we have to do is basically subtract two or three-pixel values for each horizontal and vertical gradient. How we subtract pixels depends on which edge detection algorithm we are using.

3.1Calculating the gradients

The basic idea of calculating the gradient is the same irrespective of the edge detection algorithm we use. The idea is to do addition/subtraction along the horizontal and vertical axis to calculate the horizontal and vertical gradients.  We do this by taking 3 by 3 window of pixels of the original image at a time and doing computations on them. The value that gets calculated is for the center pixel. We create a new 2D array of the same size as the original image to put in the gradient values we will be calculating. Let's see how to calculate the gradients with Sobels edge operator with an example.

Sobels Edge Operator


This is the Sobels edge operator. What it is telling us is for calculating the horizontal gradient(gx) we need to multiply the Gx in the above image to the corresponding values in a 3x3 window of the original image and then take the sum of all these elements and put at the center pixel. eg 

-1*(1,1) + 0*(1,2) + 1*(1,3) and so on.

Let's take a sample image to make this more clear.


This is a 4*5 image. We start by taking the first 3*3 window:


Calculating the horizontal gradient(gx) for this window:

-1*125 + 0*80 + 1*95 + (-2)*90 + 0*240 + 2*200 + (-1)*10  + 0*250 +1*250 = 430
Now we place this in the new 2D array that we create at the center position of this window which is 2,2( with index starting from 1). 

So now the 2D array of the horizontal gradient will look like:

Now we move the 3x3 window one pixel towards the right. The window would look like:


Similarly, we calculate the horizontal gradient(gx) for this window and put it at the center, which would correspond to 2,3. When we reach the end of the image by sliding this 3x3 window we move the window one pixel down and start from the extreme left of the image again(column 1). we do this till we reach the bottom right of the image.

After we calculate all the horizontal gradients in this manner the array of the horizontal gradients would look like this:


Similarly, we would calculate the vertical gradient using the Gy in Sobels edge operator.


The total magnitude of change at a pixel is given by :


For example, the total magnitude of change at a pixel 2,2 is:
square root( square(value of gx at 2,2) + square( value of gy at 2,2) )  

The direction of change is(gradient angle) :


Note that this is the direction of the change of magnitude and not the direction(angle) of the edge. The edge angle is gradient angle + 90.


4.Steps involved in edge detection


  1. Filtering: This is done to remove the noise from the image. It may lead to loss of sharpness and the edged may become blurry. 
  2. Gradient calculation - In this, we calculate the gradient of each pixel.
  3. Thresholding - In this step we threshold the gradients so that only the gradients that are above certain threshold remain. We do this to remove weak edges and some noise. 
  4. Localization

5. Code


 import numpy as np  
 import cv2  
 from matplotlib import pyplot as plt  
   
 #read image  
 image = cv2.imread("coins.png", 0)  
 plt.imshow(image, cmap='gray')  
 plt.show()  
 rows, columns = image.shape  
   
 #initializing empty arrays, We take a array of zeros as the 3x3 edge detector is not defined at the top, bottom ,left and right most rows  
 gx = np.zeros((rows, columns))  
 gy = np.zeros((rows, columns))  
 gradient_magnitude = np.zeros((rows,columns))  
 gradient_direction = np.zeros((rows,columns))  
   
 for i in range(1, rows-1):  
   for j in range(1, columns-1):  
     gx[i][j] = -1*image[i-1][j-1] -2*image[i][j-1] -1*image[i+1][j-1] + 1*image[i-1][j+1] + 2*image[i][j+1] + 1*image[i+1][j+1]  
     gy[i][j] = 1*image[i-1][j-1] + 2*image[i-1][j] + 1*image[i-1][j+1] -1*image[i+1][j-1] -2*image[i+1][j] -1*image[i+1][j+1]  
     gradient_magnitude[i][j] = np.sqrt(np.square(gx[i][j]) + np.square(gy[i][j]))  
     gradient_direction[i][j] = np.arctan(gradient_magnitude[i][j])  
   
 plt.imshow(gradient_magnitude , cmap='gray')  
 plt.show()  


References

  1. https://en.wikipedia.org/wiki/Edge_detection
  2. https://www.mathworks.com/discovery/edge-detection.html
  3. https://en.wikipedia.org/wiki/Image_gradient
  4. Machine Vision


Sunday, 3 December 2017

Building a new 8 core PC in $100

Hi, recently my laptop broke down and I decided to build a cheap PC. My target was $100 for the CPU. At first, when I saw the prices of parts for a decent configuration I thought it won't be possible to achieve my target of $100, but when I saw some really great offers due to the Black Friday and Cyber Monday deal I thought it might be possible.

The best offers were from AMD and Micro Center. AMD was giving $40 rebate of few of its processors and Micro Center was giving additional discounts($30) if I bought a motherboard with a compatible processor. The total for this was just $42.54(inc tax) after the rebate, combo discount and $5 discount coupon I got from retailmenot.com website for Micro Center.

The case had a $15 rebate and again I used the $5 off coupon from retailmenot.com so the total for the case came out to be around $18 after tax.

The power supply had a $20 rebate and $2 on shipping so the total for the PSU came out to be $22.

Sadly there was no discounts or rebates on the RAM and it cost $31. Although If you search you can find RAM for a cheaper price. I went with this as it had good reviews.

For the hard drive, my laptop had 2 SSD so I took out one of them and put it into the PC. The good thing about Thermaltake case is that it has space to mount 2.5" harddrive. You can get these for around $40.

For keyboard and mouse, you can them for around $10-15. I got the Logitech K400 Plus for $19. 


Parts:

Motherboard - ASUS M5A78L-M/USB3
Processor - AMD Fx-8320E
Power supply - CORSAIR CX Series CX450
Case - Thermaltake V3 Black Edition
RAM - Patriot Signature 4GB DDR3


Price(before and after rebate):

The actual price of the parts was the following:
Motherboard - $55(Micro Center), $10 rebate and $30 off when buying with compatible processor
Processor - $75(Micro Center)  ,  $35 after rebate
Case - $35(Micro Center)  , $15 rebate
Power Supply - $40(Newegg) , $20 rebate
RAM - $31( No discount on this sadly)

Total price of all these parts - 35+75+55+40 + 31 = $205


Total after discounts and rebates = $42.54 + $17.65 + $22 +31 = $113.19

I know it's a little over $100, but I think with these specs it was a pretty good deal.


Rebate Process:

I have not received the money from the rebate yet but I have filled the form for all. It usually takes around 4-6 weeks. The easiest rebate process was for AMD. I just had to fill and form online and upload the bill. For the rest of the parts, I had to take printouts of the rebate forms and a copy of the invoice and mail it to them. The worst(as of now) was of Thermaltake. I had to attach the original UPC code from the box for which I had to cut that part of the box as the sticker was not coming of.


Benchmarks:

3D mark and PCMark 10 did not complete the benchmark and gave an error.
Novabench score - 909


Monday, 28 March 2016

Creating and using database in Android

Android has many ways to store your apps data, databases being one of them. In this post I will show you how to create database and how to store and retrieve data from it. I assume you are familiar with database and this post will only be on getting started with SQLite database in Android. Just like files that you save on the device's internal storage, Android stores your database in private disk space that's associated application. Your data is secure, because by default this area is not accessible to other applications.


Table Structure

Lets take a simple table  where you store contacts(name and number) which has 3 columns - id , name , number.

FieldData TypeKey
idINTPK Auto Inc
nameTEXT
numberINT


Defining a contract class

Although it is not compulsory to create this class I would recommend it as it is really helpful. A contract class is a container for constants that define names for URIs, tables, and columns. The contract class allows you to use the same constants across all the other classes in the same package. This lets you change a column name in one place and have it propagate throughout your code


public class CONTACTContract {  
   
    
 /*  Inner class that defines the table contents of the contacts table.  
   
   Create similar classes for every table that the database will have  


   By implementing the BaseColumns interface, your inner class can inherit a primary   
 key field called _ID that some Android classes such as cursor adaptors will expect it to have. It's not required, but this can help your database work harmoniously with the Android framework.  
   
     
  */  public static final class CONTACTSENTRY implements BaseColumns {  
   
   
     //this defines the name of the table in which we will store contacts  
     public static final String TABLE_NAME = "contacts";  
   
     //name of the columns  
     public static final String COLUMN_CONTACT_NAME = "name";  
   
     public static final String COLUMN_CONTACT_NUMBER = "number";  
   
   
   }  
   
 }  
 Now create a Helper class that create and maintain database and tables
import android.content.Context;  
 import android.database.sqlite.SQLiteDatabase;  
 import android.database.sqlite.SQLiteOpenHelper;  
   
 //this is the contract class we just created  
 import com.example.siddharth.AppName.Contact.CONTACTSENTRY;  
 /** * Manages a local database for Contact data. */public class ContactDbHelper extends SQLiteOpenHelper {  
   
   // If you change the database schema, you must increment the database version.  private static final int DATABASE_VERSION = 2;  
   
   static final String DATABASE_NAME = "contact.db";  
   
   public WeatherDbHelper(Context context) {  
     super(context, DATABASE_NAME, null, DATABASE_VERSION);  
   }  
   
   @Override  public void onConfigure(SQLiteDatabase db) {  
     super.onConfigure(db);  
     //use this line if you are creating table with foreign key and want to turn on   
     //foreign key constraint uncomment this  
     //db.execSQL("PRAGMA foreign_keys=ON;");  
   }  
   
   @Override  public void onCreate(SQLiteDatabase sqLiteDatabase) {  


     //change the not null constraint depending on your requirement  
     final String SQL_CREATE_CONTACT_TABLE = "CREATE TABLE " + CONTACTSENTRY.TABLE_NAME + " ( " +  
         CONTACTSENTRY._ID + " INTEGER PRIMARY KEY AUTOINCREMENT,"+  
         CONTACTSENTRY.COLUMN_CONTACT_NAME + " TEXT NOT NULL, " +  
         CONTACTSENTRY.COLUMN_CONTACT_NUMBER + " INTEGER NOT NULL); " ;  
   
     sqLiteDatabase.execSQL(SQL_CREATE_CONTACT_TABLE);  
   
   }  
   
   @Override  public void onUpgrade(SQLiteDatabase sqLiteDatabase, int oldVersion, int newVersion) {  
   
     // tThis only fires if you change the version number for your database.    // It does NOT depend on the version number for your application.    // If you want to update the schema without wiping data, commenting out the next line    // should be your top priority before modifying this method.    sqLiteDatabase.execSQL("DROP TABLE IF EXISTS " + CONTACTSENTRY.TABLE_NAME);  
   
     onCreate(sqLiteDatabase);  
   }  
 }  

A useful set of APIs is available in the SQLiteOpenHelper class. When you use this class to obtain references to your database, the system performs the potentially long-running operations of creating and updating the database only when needed and not during app startup. All you need to do is all getWritableDatabase() orgetReadableDatabase(). This class takes care of opening the database if it exists, creating it if it does not, and upgrading it as necessary.


Inserting Data


 //To access your database, instantiate your subclass of SQLiteOpenHelper  
 SQLiteDatabase db = new ContactDbHelper(this).getWritableDatabase();  
 ContentValues values = new ContentValues();  
 values.put(CONTACTContract.CONTACTSENTRY.COLUMN_CONTACT_NAME, "siddharth");  
 values.put(CONTACTContract.CONTACTSENTRY.COLUMN_CONTACT_NUMBER, 1234567890);  
   
 //insert operaation returs the rowId of the inserted row  
 //if rowId is -1 after this line it means the insertion failed  
 Long rowId = db.insert(CONTACTContract.CONTACTSENTRY.TABLE_NAME, null, values);  
   
 db.close();  


Parameters of insert function:
Parameters
tableString: the table to insert the row into
nullColumnHackString: optional; may be null. SQL doesn't allow inserting a completely empty row without naming at least one column name. If your provided values is empty, no column names are known and an empty row can't be inserted. If not set to null, the nullColumnHack parameter provides the name of nullable column name to explicitly insert a NULL into in the case where your values is empty.
valuesContentValues: this map contains the initial column values for the row. The keys should be the column names and the values the column values


Bulk Insert 

When we want insert  a large number of rows in one or multiple tables we can use the mehtod of bulk insert . It is a lot faster than inserting it one by one.

db.beginTransaction();
int returnCount = 0;
try {
    for (ContentValues value : values) {
        normalizeDate(value);
        long _id = db.insert(WeatherContract.WeatherEntry.TABLE_NAME, null, value);
        //if _id == -1 , this means insert failed
        if (_id != -1) {
            returnCount++;
        }
    }
    db.setTransactionSuccessful();
} finally {
    //if db.setTransactionSuccessful() is not called before this all the transactions will be rolled back
    db.endTransaction();
}


Read data from database

To read data from the database we use the query function  which returns  a Cursor over the result set
Parameters
tableString: The table name to compile the query against.
columnsString: A list of which columns to return. Passing null will return all columns, which is discouraged to prevent reading data from storage that isn't going to be used.
selectionString: A filter declaring which rows to return, formatted as an SQL WHERE clause (excluding the WHERE itself). Passing null will return all rows for the given table.
selectionArgsString: You may include ?s in selection, which will be replaced by the values from selectionArgs, in order that they appear in the selection. The values will be bound as Strings.
groupByString: A filter declaring how to group rows, formatted as an SQL GROUP BY clause (excluding the GROUP BY itself). Passing null will cause the rows to not be grouped.
havingString: A filter declare which row groups to include in the cursor, if row grouping is being used, formatted as an SQL HAVING clause (excluding the HAVING itself). Passing null will cause all row groups to be included, and is required when row grouping is not being used.
orderByString: How to order the rows, formatted as an SQL ORDER BY clause (excluding the ORDER BY itself). Passing null will use the default sort order, which may be unordered.

Code

SQLiteDatabase db = new ContactDbHelper(this).getWritableDatabase();  
 Cursor c = db.query(CONTACTContract.CONTACTSENTRY.TABLE_NAME,  
           null,  
           null,  
           null,  
           null,  
           null,  
           null);  
 //use this to see how many rows are there in the result   
 //c.getCount()  
 //if c.getCount() == 0 no rows are in in the result  
 //if c.getCount() !=0  
 //move to first row of the result  
 c.moveToFirst();  
 do{  
 Log.d("name = ", c.getString(c.getColumnIndex(CONTACTContract.CONTACTSENTRY.COLUMN_CONTACT_NAME)));  
 }while (c.moveToNext());  
 db.close();  
 c.close();  


The above query function generates the query "SELECT * FROM contact" which return all the rows in the contact database. 
Selecting rows from the database:

Cursor c = db.query(CONTACTContract.CONTACTSENTRY.TABLE_NAME,  
           null,  
           CONTACTContract.CONTACTSENTRY._ID+"=?",            new String[] {"1"},  
           null,  
           null,  
           null);  

The above query function generates the query "SELECT * FROM location WHERE _id=1"


Deleting data from database

To delete rows from a table, you need to provide selection criteria that identify the rows.

// Define 'where' part of query.  
 String selection = CONTACTContract.CONTACTSENTRY._ID + " LIKE ?";  
 // Specify arguments in placeholder order.  
 String[] selectionArgs = { String.valueOf(rowId) };  
 // Issue SQL statement.  
 db.delete(table_name, selection, selectionArgs);  


Monday, 24 November 2014

Installing HP laserjet 1020 plus in Raspberry Pi and printing via putty

Download printer driver
Open terminal or log in to your Raspberry Pi via putty.
Create a new directory and download the driver in it .
mkdir hppritner 
cd hpprinter
wget http://softlayer-sng.dl.sourceforge.net/project/hplip/hplip/3.14.10/hplip-3.14.10.run 


Change password of your root user 

we need the password of root user to install the driver so if you don't know what the password of root is (like it was in my case ) you can reset it by typing :
sudo passwd root


Installing HP LaserJet 1020 plus driver 
Type the following command and press enter . It will take around 15 minutes to install .
sh hplip-3.14.10.run
It will ask for your root password, enter it .


Printing a file

To print a file use the lpr command .
lpr filename


Sunday, 23 November 2014

Controlling Raspberry Pi GPIO pins remotely over a TCP connection

Open terminal or connect to Raspberry Pi via Putty and create a new file test.py
Command : nano test.py
copy the code given below and paste it in that file . The code is also available on github .
Press CTRL+X to exit and then y to save changes .
Now to run the file type sudo python test.py


from socket import *  
 ## Import GPIO library  
import RPi.GPIO as GPIO   
 # Use physical pin numbers  
GPIO.setmode(GPIO.BOARD)  
 # Set up header pin 7 (GPIO7) as an output  
GPIO.setup(7,GPIO.OUT)  
host = "0.0.0.0"  
print host  
port = 7777  
s = socket(AF_INET, SOCK_STREAM)  
print "Socket Made"  
s.bind((host,port))  
print "Socket Bound"  
s.listen(5)  
print "Listening for connections..."  
while True:  
    c, addr = s.accept()   # Establish connection with client.  
    print 'Got connection from', addr  
    c.send('Thank you for connecting')  
    data = c.recv(1024)  
    if(data == "on" ):  
        print 'pin 7 on'  
        GPIO.output(7,True) ## Turn on GPIO pin 7  
    elif(data == 'off' ):  
        print 'pin 7 off'      
        GPIO.output(7,False) ## Turn off GPIO pin 7  
    elif(data == 'close' ):  
        print 'closing connection'  
        s.close()  
        break  
   c.close()   
 GPIO.cleanup() 


Now use a TCP client to connect to this TCP server and send data .
Modify the pin number to control other GPIO pins .

Saturday, 22 November 2014

Raspberry pi ssh login without monitor and giving it static IP

Connecting Raspberry Pi to Ethernet and finding its IP address 

Connect Raspberry pi to Ethernet and power it on . The Raspbian "wheezy" distro comes with SSH telnet access enabled .
When you switch Raspberry pi on the router will allocate an IP to it .  Now log in to your router to see the IP assigned to Raspberry Pi . You can also use any IP scanner software also for finding out the IP assigned to Raspberry Pi like Advanced IP Scanner.


Connect to the Raspberry Pi via SSH / Putty

Download & Install Putty. It is not really an Install as you can run the putty.exe directly

Enter the IP address of Raspberry Pi in host name and click open.


Enter username pi and password raspberry (this is the default password )


Now you are connected to Raspberry Pi .

Giving static IP to Raspberry Pi

Type  cat /etc/network/interfaces to list the network interface currently available.


iface etho inet dhcp : This line tells us that we are using DHCP to get IP address . The IP address we get is dynamic and gets assigned to us every time we connect to router .

To set a static IP address we need some information about our connecion .

Type ifconfig to get inet address , Bcast and Mask  .


inet address : 192.168.0.100
Bcast : 192.168.0.255
Mask : 255.255.255.0

Type netstat -nr to get Gateway and Destination .


Gateway : 192.168.0.1
Destination : 192.168.0.0
 
Now we need to edit etc/network/interfaces to get static IP . 

type sudo nano /etc/network/interfaces and delete "iface etho inet dhcp" and replace with iface etho inet static and in the next line paste / write all the info we got in the above step .
It will look like : 

iface lo inet loopback
iface eth0 inet static
address 192.168.0.100
netmask 255.255.255.0
network 192.168.0.0
broadcast 192.168.0.255
gateway 192.168.0.1


 Type CTRL+X to exit then yes to save changes .


Type sudo reboot to reboot Pi . When the Pi boots it will have a static IP .