Friday, 27 July 2018

Delivering your content faster with CloudFront

About

In this blog, I will be writing about how you can connect your website to Cloud Front and make it load faster across the world. I will also show how to connect your website to Cloud Front if it is using SSL.


What is CloudFront?

Amazon CloudFront is a global content delivery network (CDN) service that securely delivers data, videos, applications, and APIs to your viewers with low latency and high transfer speeds. CloudFront is integrated with AWS – including physical locations that are directly connected to the AWS global infrastructure, as well as software that works seamlessly with services including AWS Shield for DDoS mitigation, Amazon S3, Elastic Load Balancing or Amazon EC2 as origins for your applications, and Lambda@Edge to run custom code close to your viewers.


What is a CloudFront edge location?

CloudFront delivers your content through a worldwide network of data centers called edge locations. The regional edge caches are located between your origin web server and the global edge locations that serve content directly to your viewers. This helps improve performance for your viewers while lowering the operational burden and cost of scaling your origin resources.


How CloudFront helps you deliver content faster?

CloudFront caches your data at its edge locations around the world. So, when a user requests a page from your website it checks the cache and if it is present in the cache returns the response to the user otherwise sends the request your web server which sends the response. If the request made by the user is not cached the cloud front edge location caches it depending on your cache behavior settings.


How the request is getting routed?

After you configure CloudFront to deliver your content, here's what happens when users request your objects:


  1. A user accesses your website or application and requests one or more objects, such as an image file and an HTML file.
  2. DNS routes the request to the CloudFront edge location that can best serve the request—typically the nearest CloudFront edge location in terms of latency—and routes the request to that edge location.
  3. In the edge location, CloudFront checks its cache for the requested files. If the files are in the cache, CloudFront returns them to the user. If the files are not in the cache, it does the following:


  1. CloudFront compares the request with the specifications in your distribution and forwards the request for the files to the applicable origin server for the corresponding file type—for example, to your Amazon S3 bucket for image files and to your HTTP server for the HTML files.
  2. The origin servers send the files back to the CloudFront edge location.

As soon as the first byte arrives from the origin, CloudFront begins to forward the files to the user. CloudFront also adds the files to the cache in the edge location for the next time someone requests those files.


Creating a  distribution

Go to cloud front home on AWS console and click on "create distribution" and then "get started" for "Web".

Origin Settings

Enter the "Origin Domain name". This is the URL of your website. If you are using an elastic beanstalk you have to enter the URL of it.

Leave the Origin Path empty for now.

Enter the Origin ID, this is the unique identifier for your Cloud Front distribution.

For Origin SSL Protocols,  leave it default.

Origin Protocol Policy -> This is how the cloud front makes the connection with your website. If you have SSL setup you can use HTTPS only, if your website does not support HTTPS you can select HTTP only. If your website supports both HTTPS and HTTP you can select match viewer. Although if your website supports both HTTPS, I would suggest using HTTPS Only
Leave the rest settings to default. 

Default Cache Behavior Settings

Set the Viewer Protocol Policy according to your needs. If your website is just on HTTP keep it the default one(HTTP and HTTPS). If you want your website to be only accessed by HTTPS select the second option(Redirect HTTP to HTTPS).

Cache Based on Selected Request Headers -> If you are using HTTP for your website, leave this the default(None). If you are using HTTPS for your website, select Whitelist and click on Host from the list of headers and then click on Add>> to add whitelist it. This is important because if you are connecting to the website for eg https://xyz.com and your origin has an SSL certificate for this URL it will forward the Host header that will tell that the request is actually coming from https://xyz.com.
In my case, I had an Elastic Beanstalk which had an SSL certificate for https://xyz.com on its load balancer. See packet routing to see how the connection is made to your web server.

Object Caching -> If you select Use Origin Cache Headers, you would have to specify the TTL through the headers of the requests and responses. If you select Customize, you can select how long to cache the particular object. You can specify the time for which the objects are getting cached. In creating cache behaviors you will see how you can cache different kind of objects.
Leave the rest settings to default.

Distribution Settings

Price Class-> Select where you want your objects to be cached.

Alternate Domain Names -> This is where you specify the URL from which your website will be accessed from. For eg., if you want to access your website through the URL https:xyz.com, enter xyz.com here. 

SSL Certificate ->  If you are using Alternate Domain Names, you will have to put the SSL certificate of that URL here. If you want to get SSL certificate through AWS Certificate Manager(ACM), make sure you apply for this certificate in the N.Virginia region.
Leave the rest of the settings to default.

From the place you bought your domain, point it to the CloudFront url. 


Creating cache behaviors

Once you have created your distribution, click on it and go to Behaviors and then click on Create Behavior. Cache behaviors tell cloud front what to cache, how long to cache it etc.

Path Pattern -> This tells the cloud front what objects to cache. You can write path to specific objects like images/logo.jpg or you can write *.jpg to cache all the jpg files. The same thing can be done for other files like javascript, CSS. If you change these files in your web-server, you can invalidate the cache and the new files will be cached.

Viewer Protocol Policy -> Do according to the same logic we used earlier.

Cache Based on Selected Request Headers ->  Do according to the same logic we used earlier. If the objects need to be loaded over HTTPS whitelist the Host header.

Object Caching -> For the statics file like all the images you can set a high cache time. Select Customize and write a high value for all the TTL(these values are in seconds).
Leave other settings to default.
Click on create.


Error pages

You can have CloudFront return an object to the viewer (for example, an HTML file) when your Amazon S3 or custom origin returns an HTTP 4xx or 5xx status code to CloudFront. You can also specify how long an error response from your origin or a custom error page is cached in CloudFront edge caches. You can have different error pages that are on your S3 or other location to show error page for different status codes. For eg., if your web-server if not functioning properly and returning 5xx status code you can have the error page for this. 


Invalidating cache

Invalidating cache is important when you update your static content. For eg., if you are caching CSS, Javascript files and you update them in your web-server, the changes would not reflect on the website unless the TTL of the cached objects expires. To force them to update you could invalidate the cache. To do this click on the CloudFront distribution then Invalidations and then click on Create Invalidation. In the Object Paths write the path of the object you need to invalidate, for eg., *.CSS to invalidate all CSS files.  

Geo Restriction 

If you need to prevent users in selected countries from accessing your content, you can specify either a whitelist (countries where they can access your content) or a blacklist (countries where they cannot). For more information, see Restricting the Geographic Distribution of Your Content in the Amazon CloudFront Developer Guide.

Trouble Shooting 

If you are not seeing the changes you made to your website, try invalidating the cache.

If you get a 502 error, there may be a problem with the connection between cloud front and your origin. Try to see if the SSL certificate is set if you are using https. Also, see if you have whitelisted the Host header in your Cache Based on Selected Request Headers.


Useful links


Sunday, 22 July 2018

Deploying Django project to Elastic Beanstalk part 2

What is Elastic Beanstalk? 

AWS Elastic Beanstalk is an easy-to-use service for deploying and scaling web applications and services developed with Java, .NET, PHP, Node.js, Python, Ruby, Go, and Docker on familiar servers such as Apache, Nginx, Passenger, and IIS.

You can simply upload your code and Elastic Beanstalk automatically handles the deployment, from capacity provisioning, load balancing, auto-scaling to application health monitoring. At the same time, you retain full control over the AWS resources powering your application and can access the underlying resources at any time.

In this post, I will be showing you how to deploy your code to elastic Beanstalk through the command line.


Setting up AWS Elastic Beanstalk command line tool

AWS has a command line tool for its elastic beanstalk service which you can install by running the following command.

pip install awsebcli

But before you do this, you should install aws cli.
Please see my previous post named Creating EC2 instance with AWS CLI  to see how to install and setup AWS CLI.

Deploying your code

Creating the configurations and requirements file

  • Create a folder '.ebextension' in your Django root folder.
  • Create a config file in this folder and name it Django.config (name doesn't matter, the extension should be .config).
  • Add the following content in this file:

option_settings:
  aws:elasticbeanstalk:container:python:
    WSGIPath: django_project_name/wsgi.py

  • Replace django_project_name with the name of your Django project.

Elastic Beanstalk uses the requirements.txt file to see which python modules you are using. So put all of the modules you are using in the requirements.txt file and put this file in the root folder of your django code. You can do the by executing the following command:

pip freeze > requirements.txt

Setting up git

AWS EB CLI uses git to track which files it should use for the deployment package. So all the files that you want to deploy should be added to git and the changes must be committed.
Go to the root folder of your django code
Execute the following commands to initialize the folder with git.

git init
git add . 
git commit -m "your commit message"

Please note that git add .  will add all the files in current folder and its subfolders. If you don't want this add the files that you don't want to include in a .gitignore file or add each file you want in the deployment package manually one by one.

Once you are done with the git you need to initialize the directory with Elastic Beanstalk as well and then create an environment in it.

Initializing Elastic Beanstalk

Execute the following command to initialize:

eb init

When you execute this command it will ask you for the options like application name, region etc. The first option you have to enter is the default region where you want your Elastic Beanstalk to be located. You should select a region that is close to the place where your website will be used the most as it would improve its load time. If you plan to set up a content delivery network for your website the region doesn't matter much.


 The second thing you have to set up is the application to use. This is the application on Elastic Beanstalk. If you already have an application where you want to deploy the code select it from the list otherwise select create new application.


Set up the language you are using. As we are setting this up for Django it will be python. It will automatically detect that and you just need to confirm it and provide the python version you are using for your Django project.


Setting up SSH. If you want to ssh into the EC2 which gets created by the Elastic Beanstalk select yes from the options. From my experience, I have found it really helpful to ssh into the EC2 to see live logs(tail -f). Enter the name of the key file that will be used to SSH into the EC2. This file will be saved in your .SSH folder.

Creating an Environment

Use eb create command to create an environment. You will be asked to enter your environment name and the load balancer type. Set the name to whatever you want and the load balancer type to classic. You can learn more about load balancers here.
Once you do this your code will be deployed to Elastic Beanstalk. This may take a few minutes. Once done you can use eb open to open the Django project in web browser.

Updating your code 

Add the changes you made in your code to git and commit them.
Use eb deploy to deploy the latest code.

Troubleshooting

Checking the logs

There are two ways to see the logs. The first way is to use the command eb logs and the logs will be displayed in ther terminal. The second way is to ssh( eb SSH) into the EC2 and see the logs with tail, nano etc. 


Wednesday, 11 July 2018

Deploying Django project to Elastic Beanstalk part 1

What is Elastic Beanstalk? 

AWS Elastic Beanstalk is an easy-to-use service for deploying and scaling web applications and services developed with Java, .NET, PHP, Node.js, Python, Ruby, Go, and Docker on familiar servers such as Apache, Nginx, Passenger, and IIS.

You can simply upload your code and Elastic Beanstalk automatically handles the deployment, from capacity provisioning, load balancing, auto-scaling to application health monitoring. At the same time, you retain full control over the AWS resources powering your application and can access the underlying resources at any time.

How do you deploy your code to Elastic Beanstalk?

There are two ways to deploy your Django project to Elastic Beanstalk. The first method is through the AWS console and the other way is through the Elastic Beanstalk command line tool. In this blog, I will be showing you how to deploy the Django project through the AWS console. I assume that you already have a working Django project.

Creating a zip of your code

   1. Create a folder '.ebextension' in your Django root folder.
   2. Create a config file in this folder and name it Django.config (name doesn't matter, the extension should be .config).
   3. Add the following content in this file:

option_settings:
  aws:elasticbeanstalk:container:python:
    WSGIPath: django_project_name/wsgi.py

    4. Replace django_project_name with the name of your Django project.
    5. Add a requirements.txt file in your Django project root folder and put the name of all the required libraries there. You can do the by executing the following command:

pip freeze > requirements.txt

    6. Create a zip of your Django root folder and make sure that .ebextentions folder is in zip.

Uploading your code to elastic beanstalk


  1. Go the Elastic Beanstalk page on AWS console.
  2. Click on get started
  3. Give a name to your application
  4. Set its platform to python
  5. Select upload your code and upload the zip file that you created in the previous step.
  6. Click on 'create application'.

It will take a few minutes to create an environment for your app.


There is an option to configure more settings before you create an application but you can change these configurations anytime so, for now, let's just leave that. These configurations are for things like setting up load-balancer, attaching databases, setting environment variables.

Redeploying previous version of your code

Whenever you deploy(upload) your code to Elastic Beanstalk, Elastic Beanstalk keeps track of different deployments. So anytime if you feel like the new code you deployed is not good and you want to revert to the previous version you can just select the version from AWS Elastic Beanstalk console. To do this go to your environments homepage on Elastic Beanstalk and click on upload and deploy button in the middle of the screen.


After you click on upload and deploy, click on application versions page. This will show you the list of your previous deployments from which you can select any one and deploy it again.

Troubleshooting

If you get the error Your WSGIPath refers to a file that does not exist. Go to the Django.config file in .ebextensions folder and make sure that the WSGI path is right.

You can see the logs as well to get detailed info of what is happening on the EC2 instance that Elastic Beanstalk creates to run your code. There are two ways to see the logs. First and the easy way is to go to the environment webpage you just created. On the left-hand side, you will see that there is a Logs option, click on it and then on request logs, and then you can select whether you want last 100 lines or the complete logs. The second way is to ssh into the underlying EC2 instance and see the logs. I will tell you how to do this in the second part where I also write about how to deploy your Django project through the command line.


Sunday, 17 June 2018

Creating EC2 instance with AWS CLI

About

The AWS Command Line Interface (CLI) is a unified tool to manage your AWS services. With just one tool to download and configure, you can control multiple AWS services from the command line and automate them through scripts.

In this post, I will show you how to create an EC2 instance using AWS CLI. The process of creating EC2 with AWS CLI can be divided into the following major parts:

  1. Getting access key and secret access key
  2. Installing and configuring AWS CLI
  3. Create security group 
  4. Create a key pair and change its permissions
  5. Creating EC2 instance
  6. Terminating EC2


Getting access key and secret access key


  1. Go to AWS console home and select IAM
  2. From left navigation bar select users
  3. Click on add user button on top 
  4. Enter the name of the user and in the access type select Programmatic access
  5. Click on permissions button on the bottom right
  6. Click on create group 
  7. Enter the name of the group 
  8. Select the permission you want to give to this user. For creating EC2 give it AmazonEC2FullAccess permission
  9. Click on review and then create user
  10. The new user will be creates and it will show you the access key ID and secret access key. Copy both of these somewhere as we would need this later to configure AWS CLI.


Installing and configuring AWS CLI


  1. AWS CLI can be installed using pip. Run the following command to install it: pip3 install awscli
  2. After it gets installed we need to configure it. To do that run the following command:  aws configure
  3. Enter the AWS Access Key ID and the AWS Secret Access Key you got earlier.
  4. Enter the Default region name according to you preference. Here is the list of regions. You can leave this blank if you want although if you do so you will have to provide the region input in every command.
  5. Enter the Default output format. The AWS CLI supports three different output formats:
  • JSON (json)
  • Tab-delimited text (text)
  • ASCII-formatted table (table)

Create security group 

Execute the following commands to create a security group that allows ssh connection(port 22).

  1. aws ec2 create-security-group --group-name EC2SecurityGroup --description "Security Group for EC2 instances to allow port 22"
  2. aws ec2 authorize-security-group-ingress --group-name EC2SecurityGroup --protocol tcp --port 22 --cidr 0.0.0.0/0


Create a key pair and setting its permissions

  1. For sshing into the new EC2 we create we need ssh key file. Execute the following commands to create a new ssh key file.
aws ec2 create-key-pair --key-name MyKeyPair3 --query 'KeyMaterial' --output text --region us-west-2 > MyKeyPair3.pem

      2. We need to change the permission of the key file we just created. To do that execute the following command:
          chmod 600 MyKeyPair3.pem


Creating an EC2 instance

Use the following command to create an EC2 instance:

aws ec2 run-instances --region us-west-2 --image-id  ami-32d8124a --key-name MyKeyPair3 --security-group-ids sg-fss3e980  --instance-type t2.micro --placement AvailabilityZone=us-west-2b --tag-specifications 'ResourceType=instance,Tags=[{Key=Name,Value=EC2NAME}]'


To get the image id run the following command:
aws ec2 describe-images --region us-west-2 
This would give a very large output so you may want to use it with grep

'ResourceType=instance,Tags=[{Key=Name,Value=EC2NAME}]'  This part sets the name of your new EC2 instance

The New EC2 will take a few minutes to create after which you can ssh into it using the key file you generated earlier.

Terminating your EC2

Run the following command to terminate your EC2:
aws ec2 terminate-instances --instance-id i-0xxxxxxxxxxxxxxx


Tuesday, 24 April 2018

Creating a new user and restricting him to a specific folder in AWS EC2 Linux

Creating a new user and restricting him to a specific folder in AWS EC2 Linux

Creating a new website? Need to give someone access to the website folder on your EC2 instance without giving him the complete access to your EC2? If the answer to that is yes you may find this blog helpful. 
I had to work on a website with my project partner when I thought I should use EC2 so that we both can collaborate as well as see the website live. So I needed to give access to my friend so that he can also work on the website, but at the same time, I didn't want him to get access to all the other folders that I had on EC2. 
The whole process can be divided into the following steps
  1. Create a new group and user
  2. Generating SSH keys to login to EC2 from SFTP
  3. Connecting to EC2 as the new user using FileZilla.

Let's dig deeper to understand how each of these steps works. 

Create a new group and user


  • Start by creating a new group. We will add the user we create in the following steps to this group. Use the following code to create a new group.

sudo addgroup exchangefiles

  • Create the root directory for the group. After creating the directory we change the permissions of that directory. We set it to read and execute. You can set this according to your needs. All users in this group will be able to read and execute from this folder. The can write only in their specific folders.
sudo mkdir /var/www/GroupFolder/
sudo chmod g+rx /var/www/GroupFolder/

  • Now create another directory for the user. Give it write permission as well. Same as above you can give the permissions according to your needs. Also, You don't have to create two different directories, you can create just one directory and give it the permissions you need.
sudo mkdir -p /var/www/GroupFolder/files/
sudo chmod g+rwx /var/www/GroupFolder/files/
  • Assign both these directories to the group we created.
sudo chgrp -R exchangefiles /var/www/GroupFolder/


  • Edit /etc/ssh/sshd_config and make sure to add the following at the end of the file:
  •   # Force the connection to use SFTP and chroot to the required directory.  
      ForceCommand internal-sftp  
      ChrootDirectory /var/www/GroupFolder/  
      # Disable tunneling, authentication agent, TCP and X11 forwarding.  
      PermitTunnel no  
      AllowAgentForwarding no  
      AllowTcpForwarding no  
      X11Forwarding no  


  • Now let's create a new user. 
  • sudo adduser -g exchangefiles obama 
    • If you get a command not found error It might be because your environment doesn't include the /usr/sbin directory that holds such system programs. The quick fix should be to use /usr/sbin/adduser instead of just adduser
    • Now that we have made the proper changes let's restart ssh so that it can reflect the changes.
    sudo /sbin/service sshd restart
    You are all set. You have created a new user and group and given the permission of the folder to that group. The user can connect only using SFTP protocol. You can use FileZilla for connecting using you the new user. When you log in you will be in the folder you created above. You cannot go out of that folder.

    Generating SSH keys to login to EC2 from SFTP

    Now for connecting to EC2 as the new user you first need to create the public and private ssh keys. The public ssh key will be in the home folder of the new user and you will download the private key on your system. You have to use this key file(permanent key) on FileZilla to connect to EC2.
    • Go to the home directory of the new user and execute the following commands to create a new folder and set permissions to it.
    cd
    mkdir .ssh
    chmod 700 .ssh
    • Now create a file in .ssh and set its permissions
    touch .ssh/authorized_keys
    chmod 600 .ssh/authorized_keys
    • Now generate your public and private keys using the following command. replace username with the name of the new user that you created
    ssh-keygen -f username
    • This will generate two files username and username.pub. username is your private key and username.pub is your public key.
    • Copy the public key, and then use the Linux cat command to paste the public key into the .ssh/authorized_keys file for the new user.
    cat username.pub > .ssh/authorized_keys
    • Download the private key file to your local system. This will be used to login using SFTP. 

    Connecting to EC2 as the new user using FileZilla.

    • Open FileZilla. Go to File->site manager->New Site. Enter the details here. The host is the public DNS of your EC2. leave the port empty, change the protocol to SFTP, set logon type to "key file", set the user to the new user that you created, browse to where you downloaded your private key and set it in "key file".
    • Click on connect

    That's it, you have now configured your EC2 to give limited accedd to a user. I hope you liked this blog. If you get error or get stuck on some point comment below, I will try my best to help you.

    Sunday, 22 April 2018

    Creating Database on AWS and using it on MySQL Workbench

    The relational databases in AWS are under the name of RDS which stands for Relational Database Service. AWS has a lot of different databases supported like Amazon Aurora, PostgreSQL, MySQL, MariaDB, Oracle, and Microsoft SQL Server. You can use the AWS Database Migration Service to easily migrate or replicate your existing databases to Amazon RDS.
    Creating and using a database on AWS can be a little tricky if you are new to it. In this blog I will show you how to create a database in RDS and how to connect to it from MySQL Workbench.

    Steps for creating database instance on AWS RDS


    • click on Launch DB instance
    • Select MySQL and click Next


    • In the next page select Dev/Test MySQL and click Next
    • In the Instance specificationsCheck the Only enable the options eligible for RDS free usage tier. By checking this the options available in the next setting DB instance class is set to db.t2.micro. If you want a bigger database instance you can uncheck this and select the DB instance class which you want. Please keep in mind that you would be billed accordingly.

    • Leave all other options to the default value in Instance specifications.
    • In the Settings part, put in your DB instance identifier, username and password. This username and password would be required to access you database later from MySQL Workbench.

    • Click on Next
    • In Network & Security part set Public accessibility to Yes. This setting will be required to connect from MySQL Workbench.

    • Leave all other settings to default value.
    • In Database options part, Put in your database name.
    • You can leave all other options on this page to the default value.
    • Click on Launch DB Instance at the bottom of the page.
    • It will take 10-12 minutes to create your DB instance.


    Steps for connecting to AWS RDS DB instance from MySQL workbench

    • On your AWS console go to RDS and click on instances. Here you will see the DB instance you just created. 
    • Click on the DB instance to see its details.
    • On you DB instance page scroll down to security groups.


    • Here on the security group for Inbound traffic, you will see an IP address written in the rule. This was your public IP address from which you created the database instance. What this means is it will only allow you to connect to this database instance from this IP address. We want it to be able to connect from anywhere. So to do this we need to edit this rule. 
    • Click on the security group for Inbound connection.
    • It will open a new page. On this page click on the Inbound tab of the security group.


    • Click on edit. 


    • Remove the IP address from source and put 0.0.0.0/0 . It should look like this.

    • Click on Save to save the settings. You have changed the security settings. You will now be able to connect to this database instance from any IP.


    • To connect to a database we need four things, host, port, username and password.
    • To see where your database instance is hosted go to your database instance page. See the Connect part. Here you will see the endpoint and the port. The endpoint is the host. Copy these values.
    • Open MySQL Workbench.
    • Click on the + next to MySQL Connections.


    • Enter any name in Connection Name 
    • Enter the host, port, username.
    • Click on test connection
    • If the host, port and username is right it will ask for your password, enter it.
    • If the password is right it will show a success message. Now just click on OK to save it.


    Thursday, 12 April 2018

    Implementing lottery scheduling on XV6

    About

    In this blog, I will show you how to implement lottery scheduling for XV6 operating system. XV6 by default uses Round Robin algorithm. Please note that in this implementation, the process sets its own tickets which is not ideal as it may take a huge number and the other processes would have very less chance to run.

    What is XV6?

    xv6 is a re-implementation of Dennis Ritchie's and Ken Thompson's Unix Version 6 (v6).  xv6 loosely follows the structure and style of v6, but is implemented for a modern x86-based multiprocessor using ANSI C.
    source

    What is lottery scheduling?

    Lottery scheduling is a probabilistic scheduling algorithm for processes in an operating system. Processes are each assigned some number of lottery tickets, and the scheduler draws a random ticket to select the next process. The distribution of tickets need not be uniform; granting a process more tickets provides it a relatively higher chance of selection. This technique can be used to approximate other scheduling algorithms, such as Shortest job next and Fair-share scheduling.
    Lottery scheduling solves the problem of starvation. Giving each process at least one lottery ticket guarantees that it has a non-zero probability of being selected at each scheduling operation.

    How lottery scheduling works?

    1. We have two processes A and B. A has 60 tickets (ticket number 1 to 60) and B have 40 tickets (ticket no. 61 to 100).
    2. Scheduler picks a random number from 1 to 100. If the picked no. is from 1 to 60 then A is executed otherwise B is executed. (source)


    Steps

    We need to do the following things to implement lottery scheduling in XV6
    1. Make a system call which allows you to set the tickets for a process.
    2. Code to generate a random number.
    3. In the scheduler function count the total number of tickets for all processes that are runnable.
    4. Generate a random number between 0 and the total tickets calculated above.
    5. When looping through the processes keep the counter of the total number of tickets passed.
    6. Just when the counter becomes greater the random value we got, run the process.
    7. Put a break at the end of for loop so that we don't execute the processes following the process we just run.

    Making a system call

    Each process has a ticket value assigned to it. So to implement this we need to change the proc structure which holds the information about a process and add int tickets which will store its ticket value. 
    Follow this blog to know how to add system call. In the part where you have to write the actual implementation use the following code which sets the number of tickets for a process.

     int sys_settickets(void)  
     {  
       int n;  
      if(argint(0, &n) < 0)  
       return -1;  
      proc->tickets = n;  
      return n;  
     }  


    Allocate default value of tickets when a process is created

    In the proc.c file, enter the following line of code in "allocproc" function just below "found".

     p->tickets = 10;  

    This sets the default ticket value to 10.


    Creating Random number

    1. Include rand.o\ in OBJS in Makefile
    2. Copy files rand.c and rand.h in the XV6 directory.

    After doing these two steps you can include rand.h header file in your proc.c file which is responsible for scheduling all processes.

    Scheduler Function

    The scheduler function has two for loops, one inside the other. The outer for loop just keeps on running forever. The inside for loop loops over all the processes and selects the first process that it finds in a RUNNABLE state. It then runs this process till its time quanta expire or the process yields voluntarily. It then selects the next process in RUNNABLE state and so on. This is the way it implements Round Robin.
    For lottery scheduling, we need the total number of tickets of the processes that are in the RUNNABLE state. To calculate this we put a for loop inside the outer for loop just before the inside for loop executes. This calculates the total number of tickets.
    Now we generate a random number between 0 and the total number of tickets. After we have the random number we execute the for loop that runs processes. When this for loop loops over processes, we keep counting the total number of tickets passed of processed that are in a RUNNABLE state. As soon as the total tickets passed get higher than the random number we got we run that process. 
    Now, after the process runs, we need to put a break at the end of for loop which executes all processes. This is because:
    If we don't break the value of total tickets passed will keep on increasing and will always be higher than the random number.
    Also, after we run a winning process we need to recompute the total number of tickets of all RUNNABLE processes as that value might have changed.


    Tuesday, 10 April 2018

    Adding a system call in XV6 OS

    Adding a system call in XV6 OS

    In this blog, I will show you how to add a system call to XV6 OS. We will just add a simple HelloWorld system call which will print hello world and the argument passed to the system call.

    Steps:

    For adding the system call we need to make changes in the following files:
    1. syscall.c
    2. syscall.h
    3. user.h
    4. usys.S
    5. sysproc.c


    First, we add the call to the list in syscall.c


    Next, assign it a number in syscall.h


    give it a prototype in user.h:


    Add it to usys.S, which generates the user-space assembly code for it


    Finally, we add the implementation somewhere (e.g. sysproc.c)


    Testing

    To test if the system call works, create a c file and use the system call in it. Remember to add the c file in Makefile so that you can use it.


    Adding it to make file


    Tuesday, 3 April 2018

    Mining on a budget PC

    Building a budget mining PC

    There are lots of youtube videos about building a "budget" mining rig. But most of them at least spend a $1000 on their build and get around $100 a month which makes the payback period 10 months. So, I recently decided to build my own mining PC for just $300 dollars which could generate around $150-$170  per month. My aim was just to test these and I don't actually mine any cryptocurrency.

    Parts

    Motherboard - ASUS M5A78L-M/USB3
    Processor - AMD Fx-8320E
    Power supply - CORSAIR CX Series CX450
    Case - Thermaltake V3 Black Edition
    RAM - Patriot Signature 4GB DDR3
    GPU - MSI RX 570 4Gb gaming X

    All these parts cost me around $300( to see the detailed price of each item you can check out this blog).


    Mining with stock settings

    When I was mining on the stock settings for both the CPU and the GPU, I was getting around 180-200H/s while mining with Minergate and around 22-225H/s with Nicehash for mining Monero(with CPU) and around 500-550H/s with Minergate and 550-600H/s with NiceHash(with GPU). For Ethereum, I was getting a really bad performance of just 10Mh/s with Miner gate. With Nicehash I was around 20Mh/s, which is a lot better than MinerGate but still not the best that RX 570 can do.

    Note: At this point, the gaming driver of AMD RX 570 was installed. I didn't know that AMD has released a different driver for improving mining performance. To download this driver go to this link.


    Optimizing RX 570 to give around 28-29Mh/s while mining eEthereum (Dagger Hashimoto). 

    I did the following modifications to get 28-29Mh/s from my RX 570.

    1. Install mining driver( improves hash rate by around 2Mh/s)
    2. Modify RX 570 ROM ( improved hash rate by around2-2.5Mh/s)
    3. Undervolt RX 570 using afterburner
    4. overclock memory(improved hash rate around 3Mh/s)
    5. Overclocking the core clock speed doesn't help much
    Installing the mining driver is fairly simple. Just go to the link I provided above, download the driver and install it. Modifying the ROM is easy but it fails it can make your GPU useless and you may have to take it to the service center. To modify the ROM I followed this youtube video.
    Undervolting: I saw that undervolting little bit doesn't affect the hash rate at all and brings down the power usage and temperature a little. You can try different values for this in afterburner, I have set it to -100mv.
    Overclocking the memory: This is the step which gave the most performance gain. It was showing  1750Mhz on MSI afterburner, I increased it up to 2022Mhz. If you increase it too much the system will not be stable. The screen will go blank and then come back again with default settings. Settings for my RX 570 are the following:


    Warning: don't overvolt if you are not 100% sure what you are doing. Don't let the fan run at 100% all the time as it may decrease the life of the graphics card. I saw that the fan was running at 99% so I ordered cooler master 120mm 4 case fans set for $11 and it has helped a lot. The fan speed remains around 35% now. If you can keep it with the case open it will help reduce the temperature a lot. I had to close the case as I wanted more protection for the expensive graphics card. If you are sure that your CPU is in a very safe place and keeping the case open wouldn't be a problem then you can keep the case open and use a table fan to remove heat.

    Optimizing PC to get around 330H/s for mining Monero(Cryptonight).

    There were two things I did to get around 330H/s while mining Monero

    1. Overclock the Processor.
    2. Lock Pages in Memory

    Overclock

    You can overclock the processor either through the BIOS or through the software. I don't know much about overclocking so I used the AMD overdrive to overclock the processor. SAVE all your work before trying to overclock the processor as it may make the system unstable and the PC restarts( I learned this the hard way). Always remember that setting the core frequency very high will most probably not harm your computer as long as you are not increasing the voltage. 

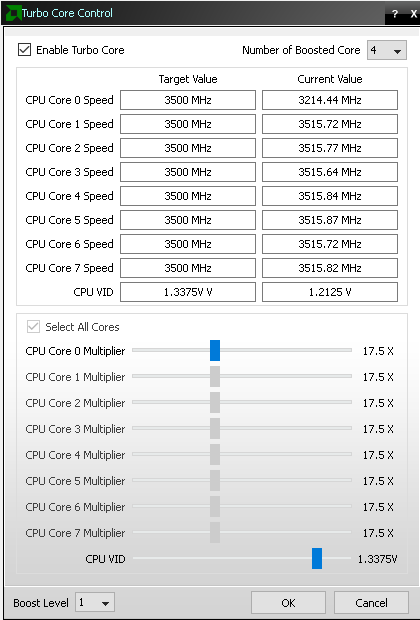
    Open AMD OverDrive as administrator(right click -> run as administrator). Click on clock/performance which is under "performance control". Now click on "Turbo Core Control".


    In the Turbo Core Control window on the top right side, you will see the drop-down menu which lets you select the number of cores you want to overclock, change it according to your preferences. On the top left side make sure "Enable Turbo Core" is checked. In this Window, you will see what the CPU core multiplier is by default.


     Now, increase the CPU 0 core multipler slowly by increments of 1 or 0.5. You want to make sure that your system is stable at that multiplier. If you set this value too high the system might restart and the default values will be restored. Not that along with setting the multiplier to 20X, I have also increased the voltage little bit as I saw it was giving a better performance at this value. Don't set the voltage too high as it may damage your system permanently. 


    Locking page files in memory

    Doing this increased the hash rate around 30%.
    To enable the lock pages in memory option
    1. On the Start menu, click Run. In the Open box, type gpedit.msc.
    2. The Group Policy dialog box opens.
    3. On the Group Policy console, expand Computer Configuration, and then expand Windows Settings.
    4. Expand Security Settings, and then expand Local Policies.
    5. Select the User Rights Assignment folder.
    6. The policies will be displayed in the details pane.
    7. In the pane, double-click Lock pages in memory.
    8. In the Local Security Policy Setting dialog box, click Add user or group.
    9. In the window that opens, enter your computer's username and click on search names and it will add your user account. I would suggest adding both your account and the administrator account there.
    10. Click on Ok and then apply.

    Performance after changing the setting to get max output

    Minergate: Monero hash rate- 190-200H/s on CPU,  650-700H/s on GPU. Whenever I start mining( auto mining, which according to them mines currencies which give you the best profit that time) it only mines Monero with both CPU and GPU. I manually started Ethereum mining to see how much hash rate I am getting after all the optimization. Even after all the optimizations, I was only getting 13-13.5Mh/s.

    Nicehash: Monero hash rate- 310-330H/s on CPU. Ethereum hash rate- 28.5Mh/s. So, as you can see from the results Nicehash was performing a lot better than Minergate.

    Minergate vs Nicehash

    As you can see from the results Nicehash is far better than Minergate. If you are using Linux setting up Nicehash may be a little difficult compared to Minergate. If you are mining on a system like this, it may be a month or so before you get your first payment. Nicehash pays you when your balance reaches 0.01BTC for external wallets. No matter which coin you are mining Nicehash automatically converts your earnings to Bitcoin and keeps it until it reaches 0.01BTC. 


    Note: Please try all these modifications at your own risk.